In a modern world obsessed with industrial seed oils and chemical substitutes, true craftsmen look backward to find quality. Before artificial fats dominated the supermarket shelves, there was beef tallow—the original, uncompromising high-heat cooking medium of the working kitchen.
Beef tallow is simply rendered beef fat. But that simple definition belies its extraordinary power in the outdoor kitchen. With a smoke point well over 400°F and a rich, primal flavor profile that amplifies rather than masks the natural taste of beef, tallow is an essential tool for the serious pitmaster.
Whether you are using it to “reverse sear” a ribeye, frying potatoes on the flat top, or injecting a brisket to maintain moisture during a long smoke, handcrafted tallow provides a depth of flavor that can’t be bought at the store.
Here is the uncompromising guide to rendering your own snowy white beef tallow at home.
1. Sourcing the Raw Material: Quality in, Quality Out
To achieve the finest, most neutral-flavored tallow suitable for all-purpose cooking, you must source the right fat.
- The Best: Leaf Fat (Suet). This is the hard, crumbly fat surrounding the kidneys and other organs. It renders down into an exceptionally clean, snowy-white product with almost no “beefy” aroma.
- The Source: 100% Grass-Fed Beef. Fat is where animals store toxins. Grain-fed industrial beef stores everything that animal ate in its fat. Grass-fed fat is cleaner, contains higher levels of healthy omega-3 fatty acids, and has a significantly richer, more yellow color (due to beta-carotene from grass) raw color before rendering.
Visit a local butcher and ask for suet or leaf fat from grass-fed cattle. It is often inexpensive and frequently goes to waste, making this a sustainable practice as well.
2. The Preparation: The Chop
Raw fat contains impurities, connective tissue, and water. Your job is to extract the pure fat while removing everything else.
- Keep it Cold: Fat renders (melts) when it gets warm. To prepare it effectively without making a mess, keep the fat extremely cold. If it feels soft, put it back in the freezer for 15 minutes.
- Chop Small: The goal is to maximize the surface area exposed to the heat. If you have a meat grinder (with a coarse plate), use it. Grinding produces the fastest, most efficient render. If not, use a sharp knife and dice the cold fat as finely as possible, aiming for pieces smaller than 1/4 inch.
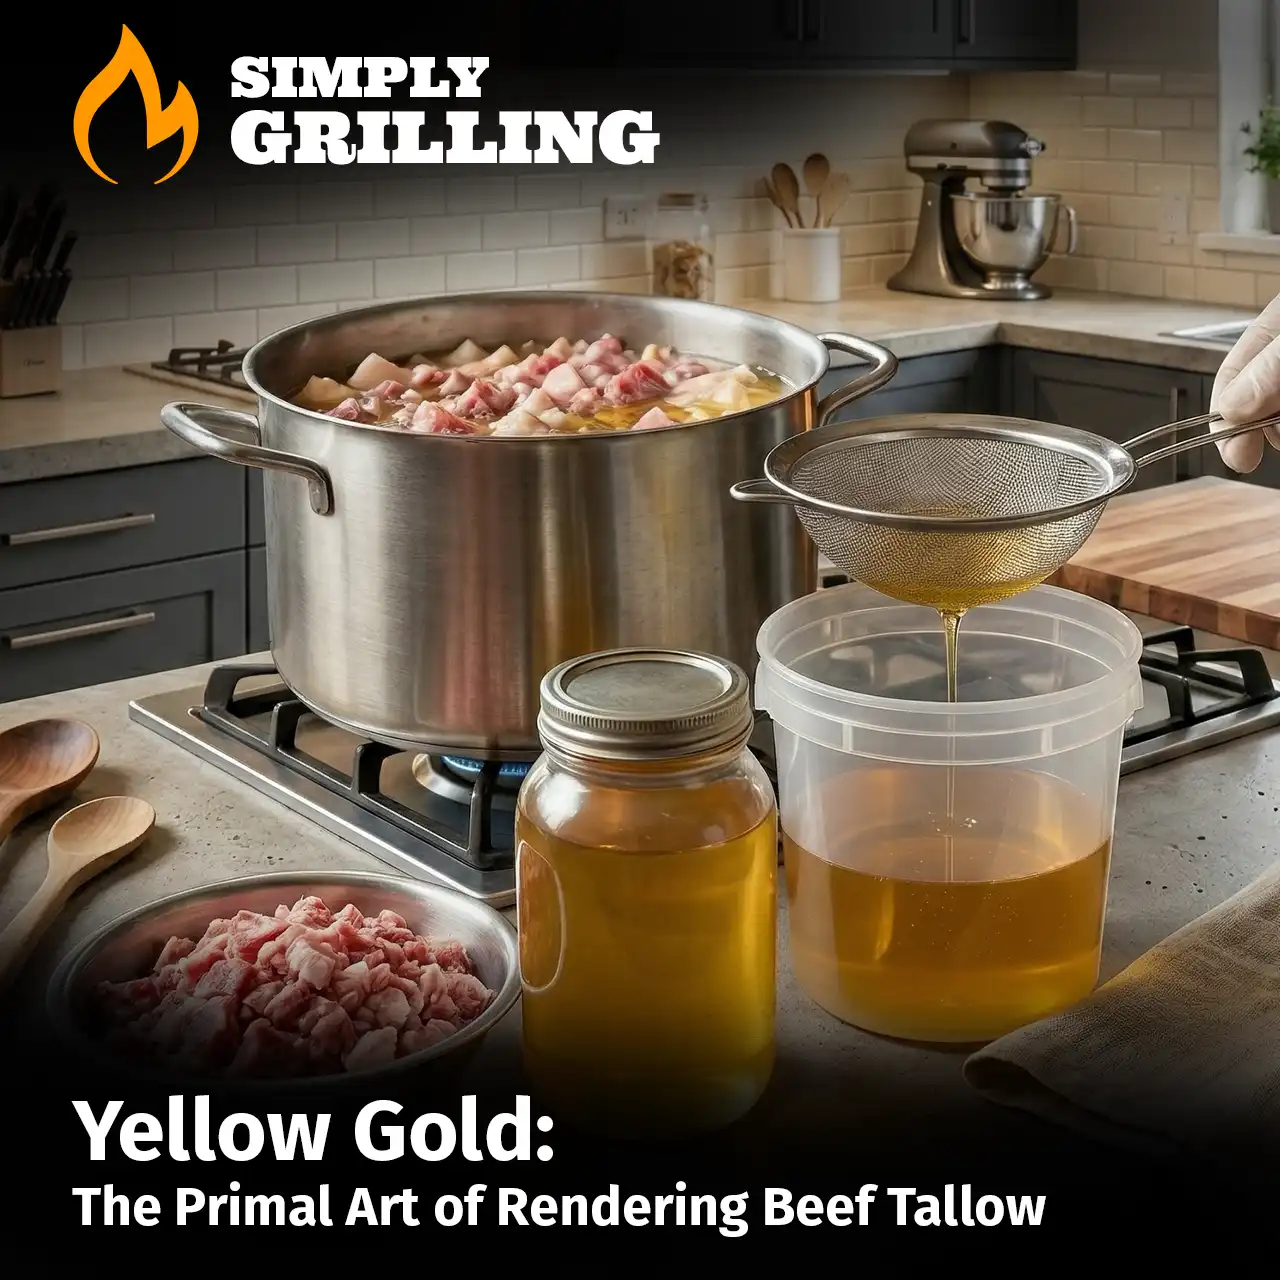
3. The Method: The Uncompromising “Wet Render”
We prefer the Wet Render Method. By adding a small amount of water to the pot, you protect the fat from burning during the initial stages and help to steam away water-soluble impurities. This results in the cleanest, whitest, and most versatile final product.
The Heat Source: Use a heavy-bottomed stockpot or, better yet, a slow cooker (Crock-Pot). The slow cooker provides the gentle, consistent, low-and-slow heat necessary for this process.
Step-by-Step Rendering Instructions:
- Add Fat & Water: Place your finely chopped or ground suet into the pot. Add about 1/2 cup to 1 cup of filtered water. (You only need a small layer to start the process).
- Set to LOW: Turn your slow cooker to its LOW setting (or your stovetop burner to the lowest possible flame).
- The Gentle Simmer: As the pot heats up, the water will begin to simmer, and the fat will slowly release its oil. Stir the pot every 30-60 minutes to ensure even rendering.
- Wait and Watch: Over the next 4 to 8 hours (depending on volume), the water will slowly evaporate. The white suet chunks will shrink, darken slightly, and become crispy. These are “cracklins.” When the liquid is clear, silent (no more water hissing), and the cracklins are a rich golden brown, the render is complete.
- The Strain: Line a fine-mesh strainer with several layers of cheesecloth over a large, heat-proof glass bowl or pot. Carefully pour the hot tallow through the cheesecloth. This final strain removes the cracklins and any remaining particulate, leaving you with pure liquid gold.
The Crucial Rule:
Do not boil. You are looking for a gentle rise of tiny bubbles, not a rolling boil. If the heat is too high, you will cook the fat rather than rendering it, resulting in a cloudy final product with a strong “beefy” odor.
4. Preservation: Storing the Heritage Fat
Pour your warm, clear liquid tallow into clean, dry glass jars (we prefer vintage-style apothecary or mason jars to match the aesthetic). Let the tallow sit undisturbed at room temperature until it cools and solidifies completely. It will transform from clear liquid gold into a firm, opaque, snowy-white solid. Once solid, seal the jars.
- Shelf Life: Well-rendered tallow, with all impurities and water removed, is incredibly stable. It will last for months on the countertop, but we recommend storing it in the refrigerator, where it will last for a year or longer.
The Ritual of Use
Making beef tallow is not a chore; it is a primal ritual that honors the whole animal and elevates the cook’s craft. When you reverse-sear that ribeye using the tallow you rendered yourself, and the flavor combines with the smoky heat of the pit and the complex spices of your OG Collection rub, you will understand the true meaning of uncompromising quality.